


Have a Question?
How To Change Your Phone Schedule
- Log into MX Administrator
- Click on the “Auto Attendant” tab at the top of the screen, then click “Schedule”
- This will open the “Auto Attendant Schedule” window. Here you will see your call routing schedule.
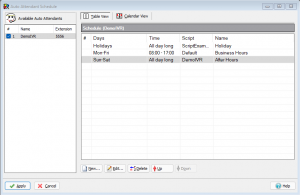
- Here you can either edit the times and dates of the current schedule or add new schedule entries.
- To edit an existing schedule entry you can right click the desired entry and click “Edit”. This will open the “Schedule Record” window where you can make the necessary changes. For example, if your business hours changed from 8AM – 5PM to 7AM to 5PM you would right click the entry for your business hours and click the “Edit” button. Then, you can change the “From” field under the “Time” group box
- To create a schedule entry, simply click the “New…” button. This will open the “Schedule Record” window.
- The “Name” field is what the schedule entry will be labeled as in the “Auto Attendant Schedule” window and can be set to anything you like
- The “Days” group box is where you will select the days you would like this schedule to run
- The “Time” group box is where you will set the time frame that you would like the routing to take place. For example, from 8AM to 5PM or “Active all day long”
- The “Script” is the auto attendant that you would like calls to go to during the scheduled time. For example, during business hours you would want the script to be set to your respective business hours script and after hours the script should be set to your night script (the names of the scripts will vary)
- An example for when a new schedule entry may be needed is if your business is closing early for a day (or multiple days)
- For instance, if you business is normally opened from 8AM – 5PM, but is closing at 4PM on New Year’s day
- First, click the “New” button in the “Auto Attendant Schedule” window
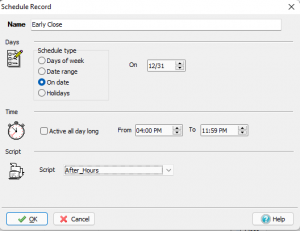
- Then, enter an appropriate label for the entry in the “Name” field
- Next, select the “On date” option under the “Days” group box. This will give you an “On” field where you can enter a specific date. Enter “12/31” in the “On” field
- Uncheck the “Active all day long” check box in the “Time” group box. Here you will set the “From” time to the time your business will be closing (in this case 4PM) and set the “To” time to 11:59PM
- You will set the “Script” field to the script that you would like calls to go to while you are closed (typically your night or holiday auto attendant)
- Once this is set you can click the “OK” button
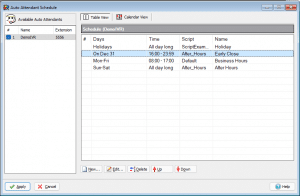
- This will bring you back to the “Auto Attendant Schedule” window. You will notice that the entry you just created is at the bottom of the list. KEEP IN MIND THAT THE SYSTEM WILL READ THE ENTRIES SEQUENTIALLY FROM TOP TO BOTTOM IN THE “AUTO ATTENDANT SCHEDULE” WINDOW. THIS MEANS THAT ENTRIES AT THE TOP WILL BE RUN BEFORE ENTRIES LOWER IN THE LIST.
- To fix this you can click on the schedule entry and click the “Up” button until the entry is above your normal business hours schedule entry. (we recommend moving the entry to the top of the list or directly under the “Holiday” schedule entry if your system has one). An example of the setup and placement of the schedule entry is below
- Finally, click the “Apply” button